Table of Contents
This is your chance to spotlight your venue, attract a crowd that loves a good time, and set the scene for unforgettable nights. By posting your events on Bartopia, you can reach thousands of bar and restaurant enthusiasts interested in your business’s events. In this step-by-step guide, you will learn how to create events on Bartopia.
How to Create an Event
Prerequisites
Step #1 — Navigate to your Business Dashboard
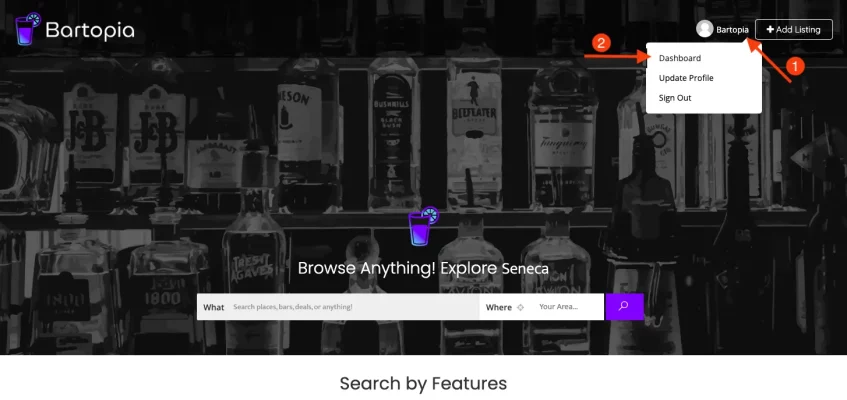
Login to your Bartopia account by using your username or email address and password.
- Hover over your Username in the header menu.
- Click Dashboard.
Step #2 — Navigate to the Events Dashboard
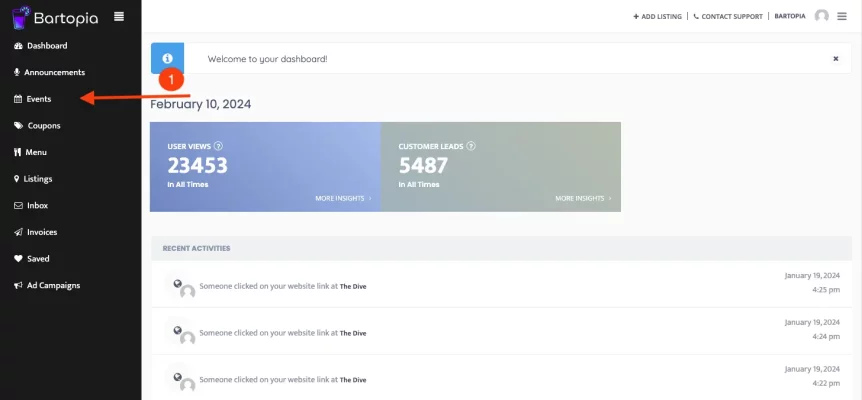
- Click Events in the side menu.
Step #3 — Create a New Event
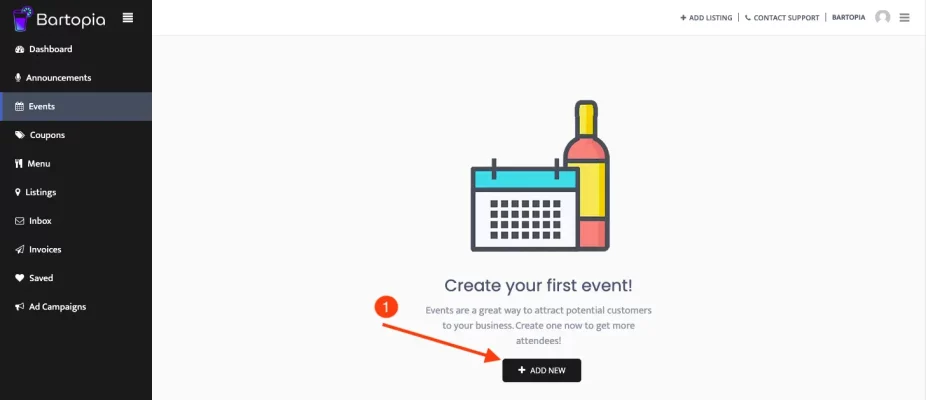
- If this is your first time creating an event, click the ADD NEW button in the center of the screen
Step #4 — Fill out the Event Creation Form
Now we will go through each field of the form:
- Choose An Event Organizer's Listing
Here you will select the business that will be hosting the event. You will likely only have one option unless you manage more than one business’s listing. This is a required field.
- Event Title
Here you should put the title of the event. We recommend keeping it short and to the point as this will be an important factor on whether a user clicks or not. This is a required field.
- Event Location
Here you should put where the event will be taking place. While an event can be hosted by a your Business, here you should put the actual address of where it will be taking place. This is here in case the event is not actually taking place at the Business’s physical location. You have 3 options on how to fill out this field:
- Search By Google (default)
- Manual Coordinates
- Drop Pin
We recommend using the default setting, Search By Google, to find and automatically fill out the address for you. In case the address cannot be found on Google Maps. You can use one of the other two options to specify the exact location. This field is required.
- Event Starts & Ends
These two fields are grouped together as they denote when the event will start and end. Simply click on each field and either use the helper calendar and time selector, or type the date and time in by hand! This is a required field.
- Event Description
Here you will write a description of the event. Now that a potential customer has clicked on your event, make sure to write a captivating description to make them want to attend! Be sure to include any details or information about the event that has not already been covered by the above fields. This is not a required field, but it is highly recommended that it is filled out.
- Event Tickets
Here you will put a URL link or links to where attendees can purchase tickets to the event. This field is not required.
Important: After inputting the url into the field, click the Black + button that appears to the right of the input box. This is necessary to save the link and to allow you to add more if you desire.
- Event Featured Image
This is the last but possibly most important field in the form. Here you will put a featured image for the event. This will be displayed to the potential customers and attendees. Unfortunately most people judge books by their covers, so be sure to choose a graphic that will grab their attention! For the optimal image size and quality, choose an image that has an aspect ratio of 3×2 (ex. 300×200 pixels or 600×400 pixels, etc.). These images will retain their original shape and quality. You can upload a picture that is not within these dimensions, but it will be cropped to this ratio.
You're Done!
Make sure to double check all of the form entries. If everything looks good, click Save. Your event is now live!
How to Edit an Event
Step #1 — Select the Event
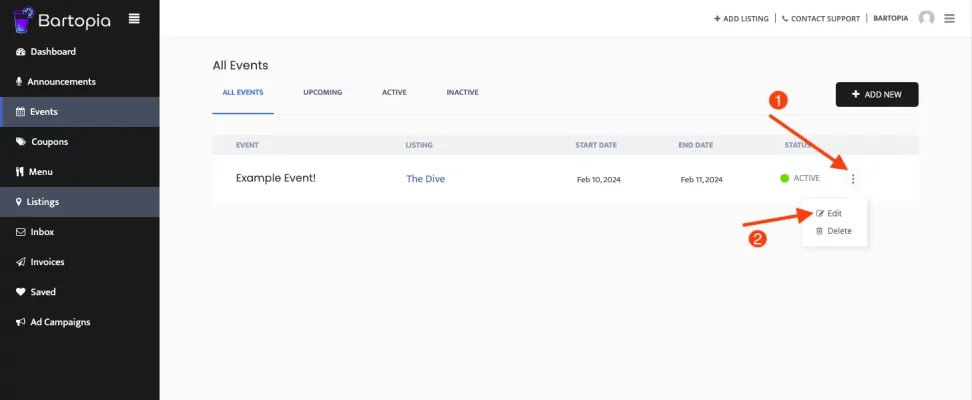
Find the event you want to edit.
- Click the 3-dot menu on the right side of the event.
- Click Edit in the dropdown menu.
Now, follow the same steps as above from the Fill out the Event Creation Form!
How to Delete an Event
Step #1 — Select the Event
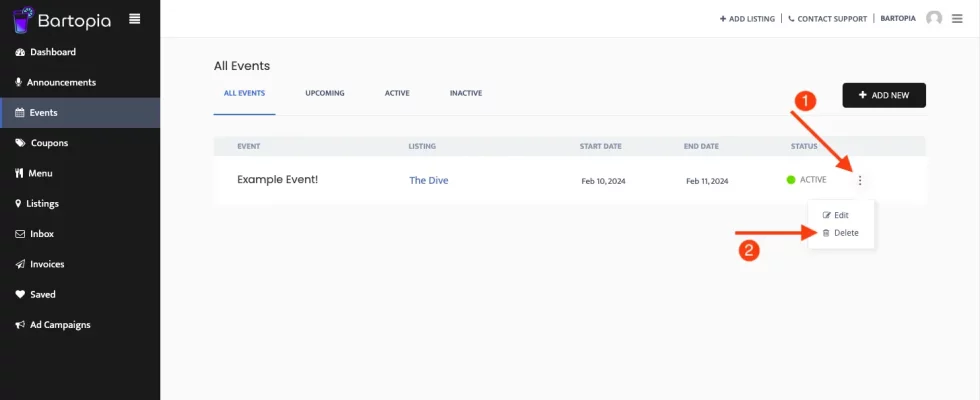
Find the event you want to delete.
- Click the 3-dot menu on the right side of the event.
- Click Delete in the dropdown menu.
That’s it! The event is now deleted.
We hope you found this article helpful! If you need any further assistance, feel free to Contact Us!

